
Soho Experiential PINATA Handbook
YOUR PINATA ADMINISTRATORS
Libby VanderMolen libby.vandermolen@sohoexp.com
Martin Martin martin.martin@sohoexp.com
FROM PINATA
For immediate technical assistance, please email support@gopinata.com.
It’s our great pleasure to power Soho Experiential’s Field Marketing initiatives. We’re here to help you simplify your work, analyze your data, and generally make the most of the PINATA platform.
— The PINATA Team
What is PINATA?
PINATA is a software platform to codify, enforce and optimize field activity. We make offline campaigns easier to execute, more efficient, and more measurable by bringing all your work into one centralized command center. Our mission is to help you improve ROI in the field while simplifying your day-to-day work.
Why is Soho Experiential using PINATA?
Soho Exp plans to standardize and facilitate a smoother field marketing operations. From managing brand ambassadors to reviewing field performance, these improvements will ultimately result in more clarity and a streamlined process for all parties. In addition, we’ll have a clearer line of sight into what’s working and how to best replicate success.
Thank you for your participation in achieving these goals!
Current Implemention Overview
The Soho Exp team has worked alongside the PINATA team to configure the platform to its optimal uses. PINATA ‘programs’ are set for each marketing initiative and market. Included in this is a standard data capture for each type of field activity.
Getting Paid by Soho Experiential
Agency payment terms are based on SOWs and are net 15 from invoice submittal. Promotional staff are paid weekly for work done from Sunday to Saturday, with payments issued the following Friday. If you have any payment questions, it is best to contact Soho Exp directly.
Technical Support
New User Setup & Login
New User Setup
Learn how to invite new users by clicking here.
Once you have invited your team and they have accepted their invites, you will need to add their Employee ID and tag them as your market. This is crucial for payroll. See the steps below:
Log in to PIÑATA. In the upper right, click on the “MENU” option and select “MY COMPANY”.
The page should default to the “Team” option on the left; if not, select it.
You’ll now see a screen that shows “Active” Team members; these are people who’ve accepted their invitations.
If your Go Getter has not accepted their invitation, they will appear under “Invited”. You can resend their invite or copy their invite link and send it to them if needed.
IMPORTANT: A Go Getter MUST HAVE ACCEPTED their invite in order for you to be able to update their Employee ID number.
To search “Active” Team members, use the “SEARCH” function to search by name or email address.
To confirm your Go Getter has been invited but hasn’t accepted their invite, enter their email into the search field.
Once your Go Getter’s name appears under the “Active” users search, click on their name (colored light blue.)
This will open up the Go Getter’s “Profile”.
Toward the top of the screen, below the Go Getter’s picture, you’ll see options for “Contact”, “Profile”, & “Internal”; click on “Internal”.
Next, click on the button called “Edit Internal Info on GoGetter”.
Enter the Go Getter’s Employee ID in the section labeled “Employee ID”.
Next, in the “Tags” dropdown, search for your Market’s tag and click on it to tag your Go Getter.
Finally, MAKE SURE TO CLICK ON THE BUTTON ON THE BOTTOM of the section called “Save Internal Info on GoGetter”.

Existing User Login
Go to dashboard.gopinata.com to access your company’s dashboard. Brand Ambassadors should go to go.gopinata.com to login.
Bookmark PINATA on your computer or phone! Click here to learn how.
Task Creation, Edition, & Cancelling
Task Creation
Learn how to create a task by clicking here. If you would like to create tasks in bulk click here to learn how.
Task Editing
Learn how to edit a task by clicking here. If you would like to edit tasks in bulk click here to learn how.
Task Cancellation
If you need to cancel/trash a task, click here to learn how. If you would like to cancel tasks in bulk click here to learn how.
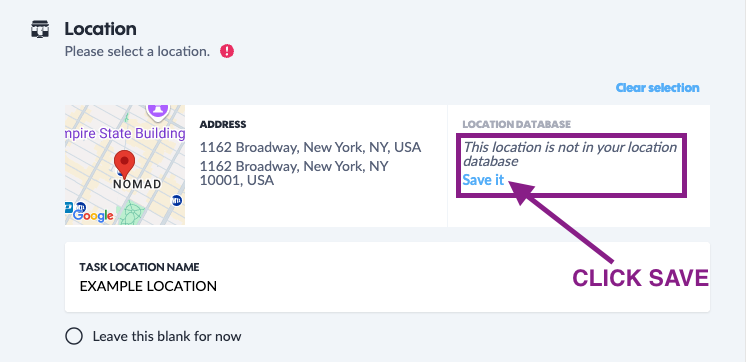
Event Location Selection
When adding a new location in PINATA: please make sure to save the location after entering the details. If it is not saved, it will not be tracked in the system.
To do this, simply click the blue "Save It" button after entering the location information. This step is crucial to ensure everything is properly recorded and reflected in our reporting.
Managing & Assigning Brand Ambassadors
Applying Tags to Brand Ambassadors
You can apply tags to a brand ambassador to signify for example their territory or certifications. Click here to learn how.
Directly Assign a Brand Ambassador to a Task
One assignment option you have is direct assignment. This option is typically used when you know exactly who will work a task/demo for you. Click here to learn about this option.
Opening Tasks up for Application or First-Come First-Served
Another assignment option you have is to send tasks/demos for your team to apply for or claim. Click here to learn about this option.
Check out the video below to see how using your Market tag can help narrow down who you open tasks to! ⬇️
Assigning More than 1 Brand Ambassador to Work a Task/Event
If you need to assign more than one Brand Ambassador, you will need to duplicate the task and change the activity to Support Staff. See below for the steps!
Click Create; pick the Program you need
Fill out required fields (date, time, location, etc.)
Under Activity, select your desired event type as the Activity
Save the task and of the next options that appear select Duplicate
In the duplicated task, change the Activity to Support Staff and Save the task
Assign Brand Ambassadors as normal to each task
Dashboard & Schedule Navigation
Task Verification & Consolidated Reporting
Verify a Completed Task’s Report
Once a Brand Ambassador has completed their task/demo report you will need to verify the data they captured. Click here to learn how. Please make sure there is an hourly rate entered into the Billing section of each task you verify. This will contribute to accurate and seamless payroll.
View a Completed Task Report
Individual Task Reports are located in the Finished section of the status bar. Click here to learn more about viewing completed task reports.
View an Aggregated Report
Once a task has been verified, it will populate within Reports. Click here to learn more about the Reports tab offerings. Click here to learn more about how to filter + download aggregated reporting data.
Invoicing on PINATA
Create a new Invoice
As you verify task reports, you can add them to an invoice. Click here to learn how to create a new invoice.
Edit an Invoice
You may need to modify the details of an invoice before you send it to Soho Exp. Click here to learn how to edit an invoice.
Send an Invoice to Soho Exp
You will need to send your invoices to the Soho Exp Team for approval. Click here to learn how to send an invoice their way.
The screenshot below highlights the difference between the Finalize button and Airplane Icon button. Clicking the Airplane Icon button will send your invoice to Soho Exp. ⬇️

lkjvglkdfjglkdfjglkfdj
Training Video Resources
Below are the links to the Zoom recordings for the PIÑATA training videos from Winter 2025:
Soho Exp XP & LEG Pilot Users <> PINATA Walkthrough (2/5)
PIÑATA Pilot Users (2/7)
Soho Exp Pilot Users <> PINATA Q&A Session 1 (2/12)
Soho Exp Pilot Users <> PINATA Q&A Session 2 (2/13)
PIÑATA Sampling Agencies Walkthrough (2/27)
Soho Exp Pilot Users <> PINATA Q&A Session 3 (2/20)
Onboarding New Users (2/24)
XP & Leg All End Users <> PINATA Walkthrough (2/26)
Soho Exp Market Managers <> PINATA Walkthrough (2/26)
SoHo Exp <> PINATA Weekly Sync | Financial Reporting (2/27)
PIÑATA Q&A - 3/5 Call Recording (3/5)
Soho Finance Team (3/10)
PIÑATA Invoicing Walkthrough (for Agencies) (3/11)
PIÑATA Payroll Walkthrough (3/11)
More Technical Support
You can also visit the PINATA Help Center for more common FAQs + how-to’s.
When in doubt, reach out! The PINATA Support Team (support@gopinata.com) is here to answer any questions or provide a refresher on PINATA’s software when needed.